Metainformationen zur Seite

(diesen Absatz entfernen, wenn die Übersetzung abgeschlossen wurde)
Native PC
Vorbereitungen durchgeführt?
Lese Dir zuerst die → Anleitung zur Vorbereitung durch!
UEFI or BIOS?
First, you have to find out whether your PC contains UEFI (Unified Extensible Firmware Interface) or BIOS (Basic Input/Output System):
In case of an UEFI based PC see the “UEFI Installer image” tab. In case of a BIOS based PC see the “BIOS Installer image” tab or “BIOS direct write image” tab. “BIOS Installer image” or “BIOS direct write image”?
“BIOS Installer image” or “BIOS direct write image”?
The “BIOS installer image” is used to boot from and install the DietPi system on a different target boot drive (storage medium). In contrary to that the “BIOS direct write image” is used to be write the image directly to the target DietPi boot drive.
UEFI Installer Image / BIOS installer image
Download Rufus and run the application. There is a portable version of Rufus available which doesn’t require any local installation.
Be careful if you run alternative applications!
While Balena Etcher is recommended for installing DietPi on SBCs, it does not provide good results for UEFI images. The same also with win32diskimager, which does not work as an alternative.
Write image to USB drive
Start Rufus application and make sure you have your USB drive inserted into your computer. Follow the next steps:
- Select the USB device
- Select the downloaded DietPi image
- Select GPT as partition scheme
- Select UEFI as target system
- Click on Start button
Ensure that the selected USB medium is the correct one.
All data on the USB medium and later on the target PCs harddisk will be erased!
Before starting the installation first make a backup of the data available on the target PC and USB drive if you need it later again!
Boot the target PC and install the image on the local disk
Boot the target PC from the USB image and install the image on the local disk / harddisk. Put the USB stick into the target PC and boot from this USB stick.
BIOS settings
It may be necessary to change BIOS settings to enable the UEFI boot or USB stick boot. This action is not described here.
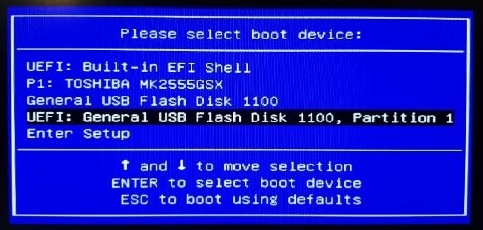
During the initial boot, the following dialog may appear to boot from the USB stick:
After booting the graphics selection dialog appears:
You can select the default settings. In case of problems, please select “Safe graphic settings”.
Once this step is completed, you will able to select a different keyboard. If necessary, change your keyboard settings and go through the appropriate dialogues.
Then the installation process begins with the help of the wonderful Clonezilla tool.
Select the image file to be installed on the target PCs harddisk. Normally you should only see one single option:
After this, you have to select the target PCs harddisk where your DietPi shall be installed. In this example there is only one harddisk present:
After this, the installation process starts with several steps, e.g. showing the process of the image copying:
These steps take some time, be patient! Otherwise buy an SSD. ::-)At the end the system executes a shutdown.
WiFi connection
To setup the WiFi, you have to change the network settings matching to your environment:
- Open the file
dietpi-wifi.txtand setaWIFI_SSID[0]to the name of your WiFi network. - In the same file
dietpi-wifi.txt, setaWIFI_KEY[0]to the password of your WiFi network. - Save and close the files
You need to set these values before you boot up the PC for the first time (initial boot).
For the first boot up of your PC disconnect your USB stick from the target PC and power on the PC to login and execute the first boot procedure.
Bios direct write Image
Download Rufus and run the application. There is a portable version of Rufus available which doesn’t require any local installation.
Be careful if you run alternative applications!
While Balena Etcher is recommended for installing DietPi on SBCs, it does not provide good results for UEFI images. The same also with win32diskimager, which does not work as an alternative.
Write image to disc drive
Start Rufus application and make sure you have your disc drive connected into your computer. This may e.g. be done using an USB to SATA controller if you use a SATA disc drive. Follow the next steps:
- Show advanced drive properties and select List USB hard drives
(in case that you have connected your disc drive via a USB adapter) - Select the disc drive device
- Select the downloaded DietPi image
- Click on Start button
Ensure that the selected disc drive is the correct one.
All data on the disc drive will be erased!
Before starting the installation first make a backup of the data available on the disc drive if you need it later again!
Boot the target PC
WiFi connection
To setup the WiFi, you have to change the network settings matching to your environment:
- Open the file
dietpi-wifi.txtand setaWIFI_SSID[0]to the name of your WiFi network. - In the same file
dietpi-wifi.txt, setaWIFI_KEY[0]to the password of your WiFi network. - Save and close the files
You need to set these values before you boot up the PC for the first time (initial boot).
For the first boot up of your PC disconnect your disc drive from your working PC and connect it to the target PC. Then power on the target PC to login and execute the first boot procedure.


